Introduction
For my final project in Introduction to Graphics (CPE471) during Spring 2016, I decided to implement a dynamic cubemap. My primary goal for the proejct was to render a relatively realistic looking scene. This program renders a reflective or refractive sphere in the middle of the scene, simulating the effects of light based on the sphere's current shading model.

The program makes use of the following computer graphics techniques:

  • Environment Mapping
  • Skyboxing
  • Reflection
  • Refraction
  • Blinn-Phong shading
Program controls:
  • Mouse Click + Drag: Rotate camera.
  • Shift + Mouse Drag: Pan camera.
  • Ctrl + Mouse Drag: Zoom camera.
  • 'q': Enable/Disable dynamic cubemap.
  • 'r': Toggle between reflective and refractive surface.
The finished program looked something like this. The GIF quality is a bit poor, so please bear that in mind. The after images that appear in the sphere below do not show up in the actual program.

Environment Mapping
Environment mapping is an image-based lighting technique where we can approxiamte the appearnce of a reflective or refractive surface using a texture image. In the case of a 3D world, this can be done using a type of texture called a cubemap.

What are cubemaps?

A cubemap is essentially a box made out of six 2D textures, which can be provided to the program or generated at run-time. A cubemap made out of provided textures are called static cubemaps, whereas textures provided at run-time are called dynamic cubemaps.

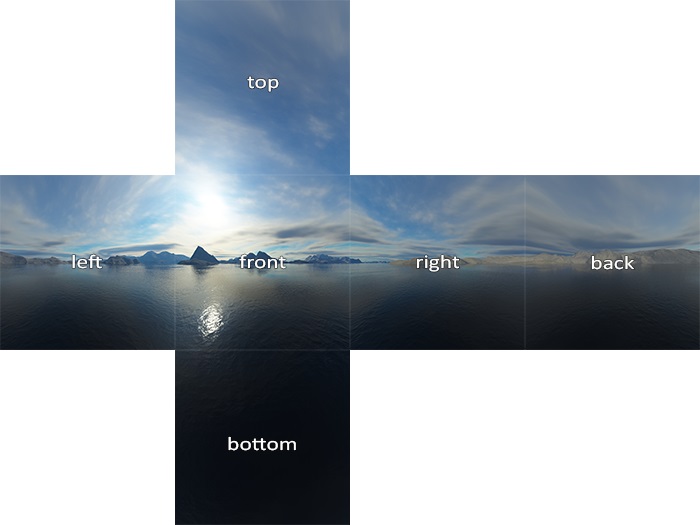
After providing a cubemap to the program, the fragment shader computes a normalized direction vector from the origin of the object, and the first fragment color it finds is used to color the object's fragment. The image below illustrates this concept.


Creating a static cubemap

In OpenGL, there is a enum called GL_TEXTURE_CUBE_MAP. When binded to newly generated texture, this informs OpenGL that we're going to create a cubemap. We assign the images to each side of the cubemap using the GL_TEXTURE_CUBE_MAP_POSITIVE_X enum, where positive x is the image on the "right" face of the cube, as shown in the following picture. We can get the other sides of the face by adding into our GL_TEXTURE_CUBE_MAP_POSITIVE_X enum.


For a static cubemap, this is very easy. We simply supply the corresponding images into our program, and then load the textures once in our program before rendering. During each rendering call, we pass the cubemap texture into our fragment shader and let it do the heavy lifting for us. In GLSL, we can specify a cubemap texture as so: uniform samplerCube. We can determine the color of our object's fragment by then calling textureCube(cubemap, directionVector).

Generating a dynamic cubemap

Creating a static cubemap can create beautiful, stationary scenes, but it needs to be remembered that a dynamic cubemap is one that displays the surrounding environment in real-time. So, we simply cannot load the images into our program to display a moving environment on our reflective or refractive surface. This would take way too much memory and we could not possibly account for all possibilities of a dynamic environment.

The solution to this is to generate the cubemap faces at run-time. This is accomplished by rendering our scene six times before a final render pass, once for each face on the cube. By setting the camera along each positive and negative axis and setting the field of view (FOV) to 90 degrees, we essentially capture what the face sees. We render these images into a framebuffer object, which allows us to generate textures from those images.

Once we've rendered the six textures in each direction successfully, we can combine them into a cubemap texture and then sample them in the final pass of our fragment shader, which generates a relatively realistic looking reflective or refractive sphere.
Skybox
Skyboxes are a common application of cubemapping. They allow us to create realistic 3D environments with low performance cost, which can greatly enhance the sense of realism through the illusion of making the surrounding environment much larger than it actually is. If we drop the smoke and mirrors of skyboxing, then essentially this is what our skybox looks like.

From the camera's perspective, the resulting effect is very compelling.


In my program, the skybox can be seen in the background and reflected off this sphere.


Motivation for using a Skybox

My primary goal for the final project was to render a relatively realistic looking scene. After many minutes of Googling and searching through Stackoverflow threads, one of most common suggestions to enhance realism was to use a skybox. The results are visually impressive, and the ability to render something this impressive for a low performance cost made it clear that this would going into my project.
Reflection
In layman's terms, reflection can be defined as the way light bounces off a surface. The shinier the surface, the more reflective it is. The basic concept behind the physics is shown below. In GLSL, there is a function called reflect that does all the calculations for us. By feeding the computed reflection vector into the textureCube function, we can simulate a reflective surface by using this vector to sample from our cubemap.
In my program, the surface of the sphere reflects the light coming off the environment. In this bunny example, due to the various normals of the object, we get multiple reflections on the surface, despite there only being three spheres in the scene.


Motivation for using Reflection

When thinking about how to render a realistic scene, I thought of many ways, but most of them involved extremely detailed 3D models and/or specific techniques such as shadow mapping or bump mapping. This proved to be too difficult to complete in a span of two weeks. Rendering a reflective surface was the most straightforward way to make it seem realistic, since we would expect a shiny surface to reflect the environment around it in real life!
Refraction
The counterpart to reflection is refraction. In layman's terms, this is defined as the change in direction of a light ray after it passes through some substance. The amount light bends depends on how "fast" the substances are. The physics behind the calculation of these substance speeds can be found by Googling further information on refraction. In GLSL, just like reflect, there is a refract function that computes all the math for us. The resulting vector can be used in our textureCube function to create a refractive object. The follow image illustrates how refraction works.

In my program, we can simulate a glass-like object by switching our fragment shaders to the refractive one. This refraction model also includes a little bit of reflection. As one of the spheres moves behind the teapot, we see that it looks warped just like the straw in the above image.


Motivation for using Refraction

Only having a reflective surface felt very limited in what I could realistically render. Reflection and refraction are both related, so it made sense to naturally include it as an optional shading model when writing my program. Additionally, it was another way to further prove that my program could render scenes realistically.
References
  • LearnOpenGL: Cubemaps Great resource on how to set up a static cubemap. Also provided the images for the Environment Mapping section.
  • mbroecker's Dynamic Cubemap Code reference for setting up framebuffers and view matrices in OpenGL 2.
  • Environment Mapping by Anton Gerderlan Another resource for understanding cubemapping.
  • LearnOpenGL: Framebuffers Another great resource. It helped me understand framebuffers conceptually. This website is a godsend, really.
  • Raytracing Source of the reflection illustration.
  • Index of Refraction Source of the refraction illustration.
  • 3D Game Programming All in One by Finney K.C., Chapter 18, for the pictorial skybox illustration.
  • RAGE, by iD Software for the stunning skybox image example.
  • 末田先生 for providing the base cubemap code and reflection/refraction shaders.
末田先生、
 今学期ためにありがとうございました。 テキサスでがんばってください!
 ケビン